Wednesday, December 10, 2014

Christmas and Winter Ideas


Here are some finished products to give you some ideas. Stay tuned for a step by step. 


Thursday, September 18, 2014

Terry Fox

I always struggle with what to do for Terry Fox to get kids engaged and also be educational. This is the visual journal page I did with my students this year.

Materials:
  • watercolour paint
  • paintbrushes
  • Kosher salt
  • paper
  • crayons
  • gluesticks
  • markers
  • fabric maple leaves 
  • white glue, fabric glue or a glue gun
We had been learning about Terry Fox in class by reading books, watching videos and looking at pictures.  The goal of the visual journal page was to show what they had learned about Terry Fox over the past few weeks.

Open you visual journal to a single blank page.  Paint the page using watercolour paint.


While the paint is still wet sprinkle the page with Kosher salt.

Helpful Hint:
*Use lots of water when painting the page.  If the page is dry the salt will not absorb the extra liquid to create the desired effect.


While you wait for the visual journals to dry, grab a piece of blank white paper.  Have the kids take their shoes off and using an unwrapped crayon rub the crayon over top of the paper laid on the shoe.


Cut out the finished footprint.


Glue the footprint onto the visual journal page leaving room for the title.

Helpful Hint:
*I handed out the maple leaf ahead of time so students could play around with spacing before they made a final decision and glued on the footprint.


Add a title to the page.

Helpful Hint:
*as a class we brainstormed ideas for the title but student got to pick which one they liked best.  This is a good assessment to determine if they understand what a title is for in non-fiction texts
*titles should be big bold and exciting so that they are easy to find and give the viewers an idea of the topic


Next have students brainstorm together in pairs, small groups or as a class what they have learned about Terry Fox.

Once students are ready they can start to write their knowledge onto the footprint.


The final step is to glue the maple leaf onto the page.

Helpful Hint:
*I sometimes will use a glue gun to glue on the maple leaves for the kids.  This ensures it won't fall out of the journal later and need reglueing.


Wednesday, June 4, 2014

COMING SOON!
Step by step for great new visual journal pages.  Here are a few final results!!


Friday, April 11, 2014

Paint Chip Poetry

Poetry can be colourful
We have been working on a poetry unit writing poems and publishing them online, in books and in our visual journals.  I found the idea for the colour poetry on "Fabulous in Fourth Grade".  The paint chips can be found at hardware stores and they can come in different sizes and many colours.

Materials:
  • watercolour paint
  • paintbrush
  • masking or painters tape
  • paint chips
  • gluesticks
  • sharpie markers
  • visual journal
After brainstorming and using graphic organizers students write about the colours on their paint chips using the five senses.


Open you visual journal to a double blank page.  Apply masking tape in different directions to both pages.  

Helpful Hint:
* Make sure to smooth the tape down to the page so that the paint doesn't get under the tape
*tear the tape a little longer than the page for easy removal
*use a thinner tape to allow the colours to be the focus


Use the paintbrush and apply bright colours of watercolour paint in small areas until there is no white spaces left on the paper.  

Helpful Hint:
*It's ok to paint over the tape.  It will ensure that nothing is left behind unpainted
*If you use too much paint or the tape isn't smoothed down the colour will show up underneath the tape


Peel off the tape slowly and carefully.


Once the page has dried fully use a glue stick and glue the paint chips onto the two pages.


Once finished they look pretty incredible.  Through the entire process our class had to stop many times, due to requests to have a museum where they could walk around to see what their peers have done in their visual journals.

Monday, March 17, 2014

Dancing Leprechaun for St. Patrick's Day

Dancing Leprechaun
To celebrate St. Patrick's Day we made leprechaun traps.  In our visual journal page we made a replica of what our leprechaun would look like if we caught it in the wild.

Materials:
  • green watercolor paint
  • orange, black, yellow, green and tan colour construction paper
  • green tissue paper
  • brass brad
  • masking tape
  • sponge
  • google eyes
  • variety of St. Patrick's stickers and other dollar store items
  • scissors
  • glue
  • single hole puncher
  • pencil
  • pencil crayons
  • visual journal
Open up to an empty single page of your visual journal.  To create the background use masking tape to make the desired design.

Helpful Hints:
* Anything that you cover with masking tape will be white
* Make sure to smooth the tape down to the page so that the paint doesn't get under the tape
*tear the tape a little longer than the page for easy removal


Using green watercolour paint and a sponge dab the paint onto the paper in an up and down motion.


Wait for the paint to dry and take the masking tape off the paper.

Helpful Hint:
* Make sure to leave the texture of the sponge.  Be careful not to use to much paint.
* To add dimension to the page use a light and dark green


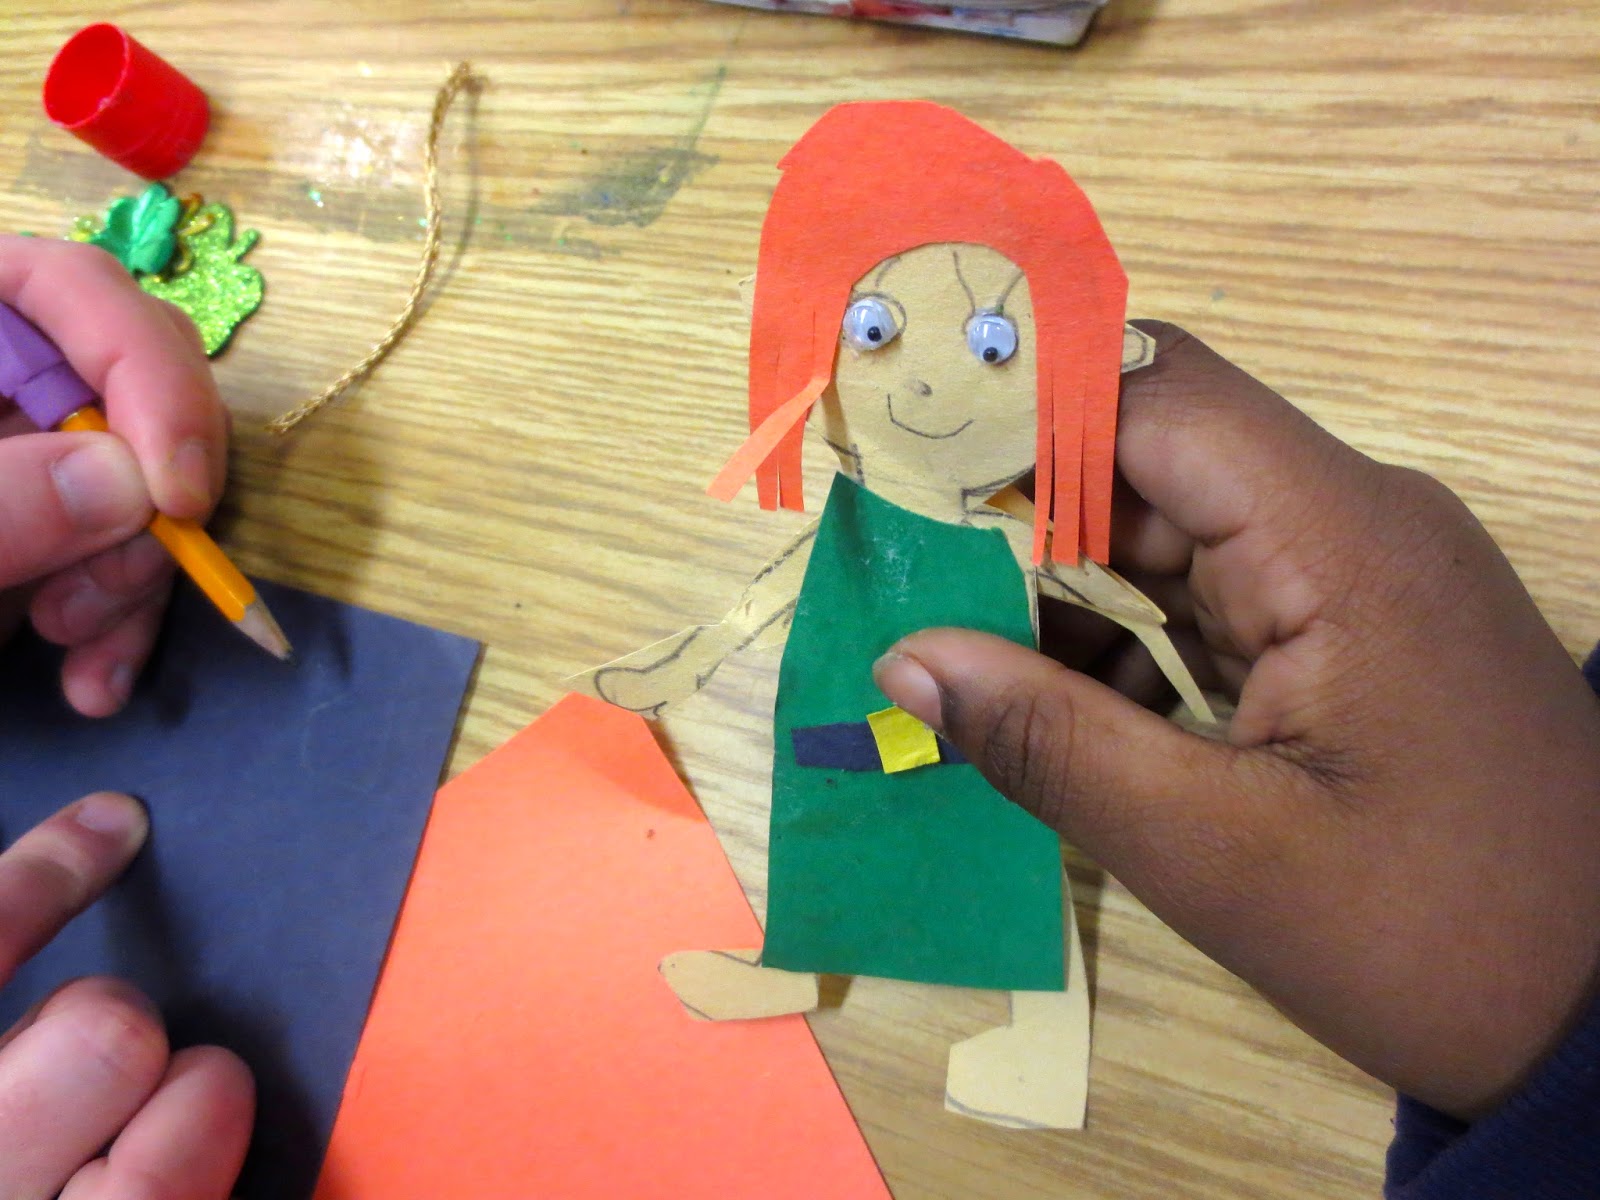
Using tan colour paper draw and cut the outline of the leprechaun doll.  Make sure to add everything from head to toe.


Using the green paper draw and cut out and outfit for your leprechaun.  Make sure that the clothes fit the body. 

Helpful Hint:
* If it is super difficult for the clothes to fit the body, just cut the body to match the clothes


Use the black, yellow and green paper to make accessories for the leprechaun (shoes, hats, belts)


Use the orange paper to make hair for the leprechaun.


Draw the outline of the face and stick on google eyes.


Using green paper cut out the shape of grass or a hill. Tear and glue small pieces of tissue paper onto the green paper to add texture.


Use a hole puncher make a hole in the center of the leprechauns belt.  Make another hole in the grass.  


Use a brass brad and connect the leprechauns belt to the grass.

Helpful Hint:
* Attach the brad loosely so there is lots of room for the leprechaun to move around


Glue the green grass to the visual journal.  Make sure that you do not glue the leprechaun to the journal.


Add as much or as little stickers as you would like.  


Put on some irish music and help your little leprechaun dance the irish jig!